Simple Motion Tracking and Moving Text Compositing
First, we need a move clip where we want to track the movement of some region. In this blog post, I'm using some footage I've shot during a drone flight across a local historical site (no twist in tongue intended).
Often, you may want to do simple motion tracking only within a certain zone of this clip. So we set up a simple project that just contains the interesting clip zone in question and put that on a track in the timeline. See also below.
 |
| Example project for simple tracking and compositing. |
Second, we also throw in a simple title clip with some silly text (such as +Kdenlive). This text then shall follow the motion of some region in our flight footage clip.
So, simply put the title clip on the track above the clip to be tracked ... and don't forget to add an affine transition!
Analyze Footage Zone
Next, we are going to analyze motion in our flight clip. For this, add the Auto Mask effect to the footage clip in the timeline. We are adding the Auto Mask to the timeline clip because we only want to analyze this particular zone, but not the full clip.
 |
| Tracking some clip region. |
Position the project monitor playhead (that is, the timeline playhead) at the beginning of your clip. Switch off the obscure parameter in Auto Mask, as we don't need to obscure the region. Then select the region to track in analysis. In this example I've selected a small window of the building the drone is passing by.
You will need to fiddle around with the region size as well as the other parameters. Personally, I find the Auto Mask rather difficult to use, as it often is extremely sensitive to parameter settings and image contrast.
Anyway, click on the Analyze button of the Auto Mask effect. Wait for the analyze job to complete; you can monitor its progress on the bin clip you are analyzing. You can rerun motion analysis as you need. If there is already motion data present, then Kdenlive will ask you to either merge the new motion data with existing data, or add a new data set.
 |
| Motion data in clip properties, Analysis tab. |
You'll find your motion data in the clip properties (you may need to show the Clip Properties pane first, if you don't have so already), under the Analyze tab. The Analyze tab is the one with the eye (in the sky?).
You may well have multiple motion data sets at the same time. These are typically named motion_vector_list, motion_vector_list2, and so on.
You can delete analysis data sets at any time by selecting one of them, and then clicking on the trash can icon.
Import Motion Keyframes
Now, in the timeline, first select the (flight) footage clip, then additionally select (hold Ctrl and click) the affine transition that combines the title with the film clip. This ensures that the transition properties are shown.
 |
| Import motion data into affine transition. |
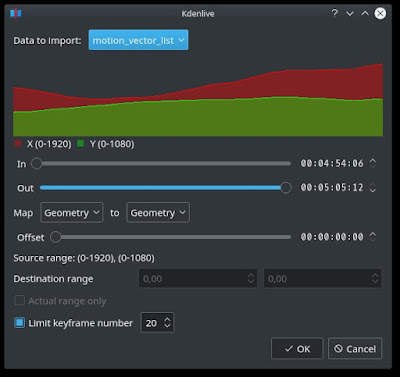
In the transition properties, go to the menu and select Import keyframes from clip. The keyframe import dialog will open. It looks like this:
 |
| Import keyframes dialog. |
The drop-down list box at the top of the dialog will show the available data sets for the clip you had selected. When doing this for the first time, you should see only a single motion data set. Next comes a cute graphical display of the (motion) data.
The In and Out sliders control the keyframe region from which you want motion data getting imported. These sliders are preset to the begin and end of the available keyframes.
The offset parameter comes in useful when you need to import keyframes to a different zone than the beginning of your transition. For example, with the settings shown above, the first motion keyframe originally was at 04:54:06 and will be imported as the first keyframe at 00:00:00 of your transition.
Finally, you can control how many keyframes will be imported using the Limit keyframe number parameter. Usually, you don't want to import keyframes for each and every frame in your footage clip. Instead, often an approximation using a reduced number of keyframes will give smoother and more pleasant results. In this example, we will import only 20 keyframes, evenly spaced across our transition.
Click OK, and you should see the keyframes now appearing in the affine transition properties.
 |
| Imported motion keyframes. |
The Result
Finally check the outcome: play your project to see whether the motion analysis produced acceptable results. You may need to slightly adjust the text in your title clip to make it appear roughly in the spot you want it to track. Otherwise, rinse and repeat.
 |
| The result. |
