 |
| Kdenlive timeline illustrated... |
This is a longer post, so these are the topics I'll cover below:
- my six pack track setup.
- a gentle start: the single clip.
- what's going on here? Two clips without transition.
- this works better: two clips and a transition.
- we'll need this often: the empty track trick.
- layered titles can be extremely useful: versatile titles workflow.
- doing titles can be tricky: adding a title ... not quite.
- how to properly do layered titles: titles done right.
- slapping on your logo: branding a project.
That's a lot of stuff for sure. But this should give you a much better understanding of how Kdenlive's timeline works. This way, you then should be able to build more complex compositions whenever you need to and won't need to stare at Kdenlive, wondering how to realize your ideas at all...
Six Pack Track Setup
 |
| My six pack track timeline setup. |
Yes, that's correct: six video tracks, see the image to the right as an illustration. I'm typically using these tracks in the following manner:
- branding track: this topmost track is for placing my personal branding logo on the resulting project clip. I'll only later explain in more details how to do this, but only after we've learned first the basics about video tracks.
- titles text track: as its name suggests, I place all my title text clips onto this track. There is one caveat here, as the track name already indicates: I'm putting on this track only text clips, such as the intro title, the credits, and so one. I'm separating my text from the title backgrounds on purpose and put them onto their own tracks (which is the next one). This way, I only need to deal with the text and maybe some specific graphics which is much easier and less prone to editing errors than fiddling around with a complex graphical title clip as a single, atomic clip.
- titles background (BG) track: I'm placing my title background clips here onto this track. This way I can even change or fix titling backgrounds as I need without having to redo all the title text clips. I simply update the titling background clip itself which I reuse throughout my project and I'm done. Sweet and simple.
- video 1/2 tracks: in many of my projects so far I could get away with two tracks for the video clips themselves. Well, I admit that I don't consider title clips to be video clips so that's my reason for naming these two tracks simply my video tracks.
- background (BG) track: this is a neat-trick track I've «discovered» some time ago and which comes in quite handy in the more complex multi-track composition situations. In addition, there's yet another really simple use case where it also is quite effective: when showing my personal branding logo with alpha information full screen at the end of each of my projects. But more on this later.
A Gentle Start: The Single Clip
Let's start easy and slowly as to better understand how Kdenlive's timeline works. So we put a single clip on track video 1 only, nothing else. I've illustrated this situation below. This illustration also shows you what finally gets rendered: this very same clip. Admitted, this is a deadly easy start, but now you've seen also my notation.
 |
| Starting simple with a single clip and some effects only. |
Finding the start of what will be rendered is easy: it's always the clip on the topmost track at a give timecode position in the timeline. As there is no transition present, we're also immediately done. Of course, any effects are applied to the clip itself.
Two Clips Without Transition
So let's slowly crank up the difficulty. Next, we throw another clip on the timeline and place it onto the video 2 track just below the first clip. This situation is illustrated below.
 |
| Two clips without transition. |
Hmm ... the second clip simply gets ignored! That is because Kdenlive builds what I simply will call here a rendering tree. The MLT framework then does the real rendering according to this tree description. Since we did not add a transition to Kdenlive's timeline, clip 2 is not a part of this, erm, tree. Well, it's not so much a tree yet, only a trunk, but you'll later see why I'm calling this a tree.
Ironically, when in Kdenlive you save a still frame from the project view in PNG format you'll get transparency around the scaled-down clip from track video 1. But in the project monitor as well as in the rendered output you'll get a black background instead, as it is shown below.Important: Even if you add a resize effect to the top clip on track video 1 you won't ever get to see the clip on track video 2. That's because the tree doesn't include the second clip. This is again due to the fact that timeline tracks are not graphics layers.
| Two clips without transition ... this doesn't work like graphics layers at all! |
Two Clips, Now With Transition
So we need to add a transition as illustrated below. The WITH property of this transition is kept as automatic, so this transition will use the clip immediately on the track below. Kdenlive calls such a reference automatic, but this is slightly misleading. Kdenlive does not search for the next clip on some lower track but instead always looks at only the track immediately below.
 |
| Two clips properly composited using a transition. |
This timeline configuration finally gives the expected result: both clips are shown, assuming that we've resized, for instance, the clip on track video 2.
Please note my notation for a transition in the rendering tree in the illustration above. The yellow top part belongs to the track on which the transition has been placed, while its red bottom indicated the track WITH which the top part gets composited. The black number indicates the sequence in which multiple transitions are carried out. This sequence will later become of importance.
For the record, here's how the project monitor looks like in this example ... now this looks like graphics layers were used. But as we will see soon, the graphics layer metaphor will quickly break down as we get to more complex compositing examples.
| Two clips with a transition create the illusion of graphics layers. |
The Empty Track Trick
Now we come to an important track that isn't obvious ... in particular, it isn't obvious to newcomers to Kdenlive: it makes sense to set the «with track» property of a transition to point to an empty track. Yes, you've read this correctly. You can find the with track property on each of Kdenlive's transition, regardless of its type. You can set with track either to «Auto» (that is, automatic) or you can reference a specific track.
| The «with track» property of each transition for controlling the tracks that gets composited. |
The trick is now to set the WITH property to reference an empty track below, such as the background track. Please see below for an illustration of this situation.
 |
| The empty track trick. |
What now happens in this special situation is this: the red bottom part of the transition now uses whatever clip it finds on the nearest track above it. As we'll later see there are many situations in which we cannot precisely say which tracks contain a clip at a specific timecode position. In such situations we then use the empty track reference trick.
The rendering outcome is no different from our previous example, as you can see below.
| Result of compositing two clips using the empty track trick. |
Versatile Titling Workflow
Before we are going to add some titles to our examples, I would like to first share some trick I've developed over time and which I found to be extremely useful. This trick improved my workflow considerably when working with titles in Kdenlive. One reason why I invented this trick is the rather basic (some would call this limited) functionality of Kdenlive's built-in title editor. Another reason is that the title editor has been slightly unstable for me all the time even in the recent 0.9.8 stable Kdenlive release.
Of course, there's always the option of creating complex titles outside of Kdenlive. Typical tools that come to mind are: The Gimp, Inkscape, and Blender (and probably several more tools). However, for my rather simple needs these tools are too cumbersome to use them for every single title clip. Also, I don't like to distract viewers with the fanciest animated titles ever done, as my projects are not about the fanciest title clips ever done. Instead, I want viewers to unobtrusively get informed without distracting too much from the video content itself.
My trick is as follows: I separate the text and graphics that are going to be different in each title clip from the static title background that is the same for each title. Below you see two examples of the title background I use in my own projects.
 |
| Simple yet versatile titling backgrounds (made with Inkscape). |
Over time, I've designed a few simple titling background that I use for typical, recurring purposes in all my projects now: opening titles, location information (think: name of place, including GPS coordinates), credits, and more. I designed my titling backgrounds using Inkscape. As I kept my Inkscape drawings simple I can directly incorporate the resulting SVG files as clips into Kdenlive.
In particular, don't use complex text features, such as text running over multiple lines, et cetera. If you need such features, then export a PNG file from Inkscape instead for use with Kdenlive projects. When we also throw in some title templates later, then we'll finally get a simple, yet versatile titling workflow. But more on this later.
Note: My titling backgrounds are not completely opaque, but instead the white background is half lucent (that is, with an alpha of 50%). In contrast, my branding logo is (mostly) opaque, but with its edges also softly blending into the background using alpha values other than 0%.
A title text clip then only contains text that differs each time I need a title. I've once created a suitable title clip using Kdenlive's built-in title editor.
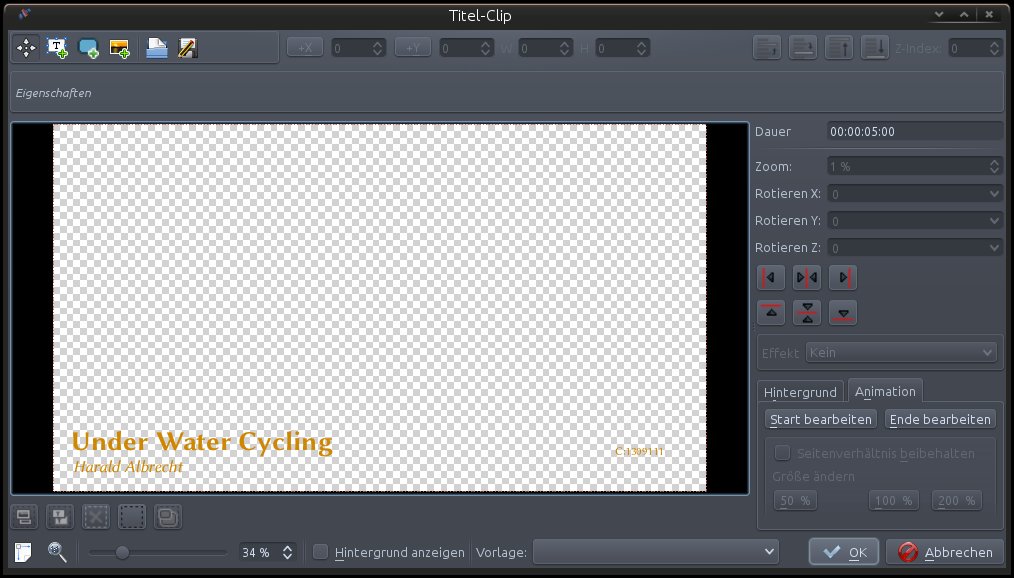 |
| A title text clip to be used with one of my title background clips. |
Instead of using Kdenlive's title template mechanism which is unfortunately extremely limited, I use a slightly different workflow: I simply save a recent title text clip from the title dialog itself, using the save icon in the dialog's toolbar.
 |
| Saving and loading title clips as a substitute to Kdenlive's limited template mechanism. |
In another project I then simple create an empty new title clip. Next, in the title editor I simply load an existing title I've saved once before. Then I edit the title text to my needs. Close the dialog and you're done. Sweet and easy.
Let's try this out...
Adding a Title, First Attempt
Now you see what the two separate tracks called titles (text) and titles background are good for. The most obvious way to work with the composite titles is to add a title text clip to the titles (text) track and the title background to the, well, titles background track.
Then we need an affine or composite transition that combines the title text with the title background. Here, with track is set to auto. And we finally need another transition on the title background clip in order to combine all the title stuff with our other clips. Here, we pull out our empty track trick again and set with track to point to the empty background track.
Instead of these many words you probably want to look at my illustration below ... and this clearly doesn't look like graphics layers anymore!
 |
| Not quite correct yet: adding a title and background the obvious way... |
...and the result of our timeline setup looks like this:
 |
| Composite titles, first attempt. Almost neat, right? |
When you look closely at the project still you should notice an ugly problem with transparency: the title text gets partly transparent too ... and this even as the text in the title text clip is opaque! For your convenience, here's a closeup; the top half shows our example. In the bottom you see what we would like to achieve instead.
 |
| Composite titles can be tricky when transparency is involved... |
So what went wrong? The key in the sequence in which the transitions gets processed. First, Kdenlive blends the two video clips into one background as part of transition (1). Next, it composes the title text with the title background as instructed by transition (2). But because the title background has 50% transparency we end up with an composite title that also has transparency where has been transparency at least in one clip or the other. When finally transition (3) combines this partly transparent title frame with the result of transition (1) this transparency in the title frame causes the background to shine through.
However, in this particular case, this is not what we want to achieve: instead, we want the title text to stand out clear from any background, yet the title background should blend with the video clips.
Adding a Title Done Right
Okay, so let's change the setup so we get what we want. In our case we thus need to change the order in which the clips get composited. Some people will probably remind the required timeline setup to graphics layers. So in order to achieve this effect, you need to change the transitions so that they all point to the same bottommost track. That is, set the with track property of all transitions to point either to the video 2 or the background track.
In the following illustration I've again used the empty track trick, as we will need it anyway when we later add channel branding.
 |
| Adding a title with background correctly. |
And this finally gives us the desired result, as this project monitor still is proof of:
 |
| Composite title clips finally combined correctly. |
In the closeup you see the correct result in the bottom part. Now, only the background is partly transparent, but the title text itself isn't. This results in a much clearer and better readable text.
|
| Composite titles done right. |
Branding Your Project (Adding a Logo)
And this brings us to our final example: adding branding to our video project. Of course there is always the solution to render your project without branding and then adding it as a final step. But this needs another project and a separate re-rendering step which is not really good for the final video quality.
With what we've learned so far, adding a logo should now be easy. Simply create a logo clip, which can be, for instance, a simple PNG file or also a title clip with the logo as an embedded image. The latter makes it easy to also add your channel name or similar.
Anyhow, simply throw your branding/logo clip on the topmost track, the branding or logo track. Add a transition to it and make sure that you set its with track property to point to the (empty) background track. So our setup should look like this...
 |
| Adding your project or channel logo (branding). |
The consequence is that the logo will always be composed into the project output last. In the illustration above you can see this as the logo transition is #4 in sequence and thus last. For the project still screenshot I've used an affine transition with my logo and set the opacity to 40% only.
 |
| The result: a partly translucent branding logo. |
That's It.
This ends my mini-series of Kdenlive's timeline illustrated. Hopefully you've enjoyed this series and may have even learned some new trick.