It's good to see that there is some active development now when it comes to whiteboard screencasting apps for tablets. Unfortunately, support for Windows 8 is severely limited: either video export is missing completely, the timeline isn't barely editable, active pen support is either missing completely or unusable.Update: added my experience made during several real-world video projects with the HD PVR rocket.
But why using Windows on a tablet?! At this time, Windows is the only tablet platform for which several tablet devices with active pens are available. Samsung seems to have given up on its Android-based S-Pen tablets. And Apple still tries to figure out what an active iPen is.
And finally there are those situations in which you need to record PC screen content with least impact on the PC itself and without hassle and jumping through many loops. These were also the constraints I faced for my first video project in my day job.
So far, I've used an elgato game capture HD HDMI recording device. Unfortunately, the elgato has one huge drawback: it needs a Windows machine for storage. And there is no change in product design visible, as newer HDMI recorders from elgato still need the dreaded Windows sinker and only aim at higher framerates.
Unleashed Recording
Fortunately, there's the Hauppauge HD PVR rocket HDMI recorder available for some time now. While you may leash the rocket to your Windows PC it will better fly unleashed. For this reason I got myself the Hauppauge rocket so I can record screencasts on my ... well ... erm ... Windows tablet.
 |
| Tablet screencasts unleashed (from Windows, that is). |
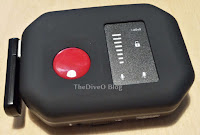
The HD PVR rocket features a brain-simple design: there is a big red recording button. Next to it, you can tap on the symbols to activate voice recording. That I don't need because I'm using my decent wireless presenter microphone system that outputs at line level. I've never tested whether the rocket also accepts line input ... but I doubt it does.
 |
| Sweet minimalism. USB memory not included. |
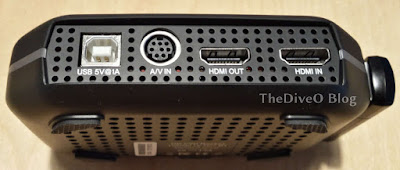
For recording you need to plug in a USB memory stick into its front (no stick included with the rocket). The rocket gets its fuel from its back USB Type A socket. A suitable A-B type USB cable is included, so you may draw the necessary power from any USB power supply.
The rocket both accepts FAT as well as NTFS formatted memory sticks. FAT comes with the usual maximum file size restriction, while on NTFS a single recording session results in a single video file, however big.
I've then hooked up my Surface Pro 3 to the HD PVR rocket using an adapter from mini DP to HDMI. Luckily, this setup worked right out of the box without any additional adaptors to be put into the digital video path.
 |
| Gimme power! Gimme signal. |
After power on wait for the rocket to correctly accept your USB memory stick. As soon as the rocket gets ready to launch it starts blinking green around its belt. Press the red button and off we go into screencasting. During recording the belt glows red.
The rocket records up to 1080p30, despite the manual mentioning only 1080p25 here in Europe ... maybe as a bow to the home of PAL. The Surface Pro 3 emits 30 frames per second so this is important to know. The video files correctly reflect 30fps (well, actually 29.995fps or so).
Recording is in MP4 format with up to 20MBit/s. In standalone recording there is no way to control maximum bitrate. If you want to do this then you need to leash the rocket to a Windows PC.
My tests in standalone mode were fully successful: screen video quality without any blame. It's easy to throw such source footage at your favorite video editor, it should be easy in postprocessing. So, the rocket is a neat little screencast servant. Of course, I will never directly broadcast any raw screencast footage, as I'm no audience tormentor.
Where to store the USB Memory Stick then...?
There's one thing still left: where to store the USB memory stick during transport so that it doesn't get lost? Leaving it inserted to the rocket will soon cause tears with a broken USB port. So I used some strong double-adhesive tape to stick the protective cap of my memory stick to one side of the rocket. When not in use I simply store the USB stick away to the side of the rocket. And the stick won't depart with me soon when transporting all my screencasting equipment in a transport case.
Update: Real Project Experience
I've now gained experience using the HD PVR rocket in several real-world video projects.
- This has been a good purchase; I'm using the HD PVR rocket to capture slightly complex technical topics in form of hand-drawn illustrations. I'm doing this on my Surface Pro 3 with an active pen. So far, I had to use my Surface for recording instead, as the elgato recorder always needs a Windows host. My semi-trusty Samsung Note 10.1 2014 now acts as a music stand ... but not for music, but for my screencast illustration boilerplates.
- What the manual forgets to mention: there's a roughly five second delay between pressing the red recording button and the actual start of the recording. So after pressing the button, wait six or seven seconds for the recording to actually start before beginning to draw the illustrations.
- After having finished the screencast illustration masterpiece, wait another six or seven seconds before hitting the record button a second time. Otherwise your recording will be some seconds short of your final illustrative strokes.
- I've finally got myself a real USB memory thumb drive. The usual long memory stick is too unwieldy. With the thumb drive it can stay inserted into the HD PVR rocket all time, even when transporting the HDMI recorder. No danger of damaging either the memory drive or the recorder.
- The captured H.264 video footage is easy to process in any decent video editor. Compression is really moderate and at least in my setting not noticeable at all. I never use raw material on any audience; all raw material gets heavily edited with decent voice over. No gamers el-cheapo bulk videos. Thanks.
