 This time we need to do some deep dive into how MLT's <tractor> works in concert with a <multitrack> and some <transition>s: this interaction is key to understanding how Kdenlive handles tracks and compositing in its timeline...
Kdenlive Timeline/MLT Tractor
In order to understand how Kdenlive's timeline works, we need to have at least some first-hand look at the underlying MLT engine configuration. The setup that MLT uses for something "timeline-ish" is basically a hierarchy of certain specific elements:
<mlt>
  <!-- some producers here -->
  <!-- ... -->
  <tractor id="maintractor">

    <!-- <multitrack> left out during serializing a Kdenlive/MLT project -->
      <!-- <track producer="black_track"/> left out for simplicity  -->
      <track producer="playlist1"/>
      <track producer="playlist2"/>
      <track producer="playlist3"/>
    <!-- </multitrack> -->

    <transition id="transition1">
      <property name="a_track">0</property>
      <property name="b_track">2</property>
      <property name="mlt_service">qtblend</property>
      <!-- ...more properties -->
    </transition>

  </tractor>
</mlt>
- the so-called main tractor is, simply spoken, the front-end to Kdenlive's project view, or another consumer rendering the final video. The tractor got its name for that it pulls frames from the individual tracks in its "belly". It returns the final frames that are going, for instance, to the screen screen or into an output file.
- a multitrack MLT service element then bundles the individual tracks within the main tractor. Luckily, we can largely ignore it from our perspective, so we won't say much about it below.
- inside the multitrack, we find all the individual tracks in form of so-called playlists. We won't cover them in detail here though. It's enough to know that tracks/playlists are producing sequences of frames.
- and finally the transitions, which can "merge" one track onto another track within a certain region of time in the timeline.
Note: In the following, I try to stick with the Kdenlive perspective, but show the underlying MLT mechanics in a simplified manner, as I'm assuming that most readers will have a strong Kdenlive background, but not necessarily any MLT background.
Tracks
At this point, there is not much to know about tracks, other than that they are producers, producing frames from a series of, wait, producers. We'll cover tracks in more detail in a separate post titled Individual Tracks.
Transitions: How Do We Get What We See?
When it comes to rendering video and audio in Kdenlive's timeline, we first need to get a rough understanding about how transitions work from the user's perspective. We get what we see, but how did we get what we see...?
Note: Kdenlive actually takes over the term as coined by MLT ... much to the chagrin of many a video editor. But as we're talking about Kdenlive and MLT internals, we'll stick to the technical MLT term transition.
In both Kdenlive and MLT, transitions combine video and audio frames from exactly two tracks: so-called "B" frames from an upper "B" track get combined in one of many ways (depending on the particular type of transition) with an "A" frame from a lower "A" track. A transition can either only span a specific region of time in the timeline, or it can be what is called "always on".
As a Kdenlive user you won't ever get to see these "always on" transitions. But behind the scenes, Kdenlive uses "always on" transitions for automatic audio mixing, as well as on-demand transparent tracks (as we'll learn in a separate post titled Internally Added Transitions).
1. A/B Tracks
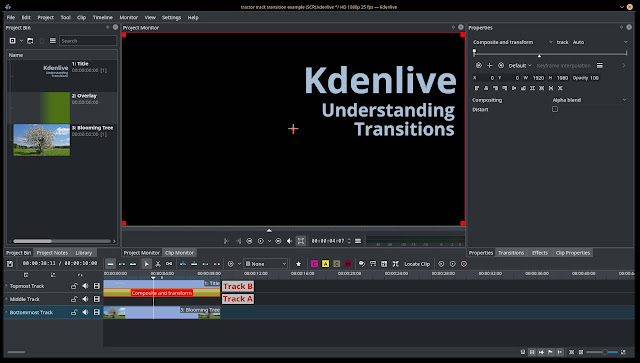
Below we see a simple project with two title clips with transparency, and a third background image clip. For starters, I've dropped the first title clip and the background image clip into Kdenlive's timeline. Then I added a transition (the new Compose and Transform). As you can see, the track property of the transition is set to "Auto". Internally, Kdenlive adds an MLT transition to its main tractor for each such timeline transition.
Note: These examples only work as shown with the timeline automatic track compositing switched off; this is also sometimes know as opaque tracks. This way, no internally added MLT transitions exists that would otherwise become active and automatically compose the clips even without any user-placed transitions.
 |
| A transition combining clips on adjacent tracks: from track B clip onto track A clip. |
Kdenlive shows this transition in form of a yellow-ish block between adjacent timeline tracks. To MLT, each transition combines frames from an upper A track onto frames from a lower B track. With the Kdenlive track property here set to "Auto", the track B is the topmost track, while track B is the middle track.
The compositing result in Kdenlive's project monitor is as was to be expected.
2. Empty "A" Tracks
Next, without changing the transition, let's tear things apart by moving the background image clip down to the bottommost track. Again, the result is probably what most might have expected: to MLT, there's no background on track B anymore, so we get our title clip from the topmost track placed onto blackness.
 |
| Result of transition lacking a clip on track B. |
Of course, correctly setting the track property to the bottommost track in Kdenlive causes things to work again as expected. To MLT, track A is still the topmost track, and track B now references the bottommost track with the background image clip.
 |
| Transition track A correctly set to bottommost track. |
In case the track property or A track of a transition isn't the next lower track, Kdenlive currently shows kind of a crude arrow head "|>" after the transition type.
3. Empty "A" Tracks Revisited: The Space Within
Now comes an important trick of MLT that only makes more complex compositing feasible. Let's keep the transition's B track still referencing the bottommost track, but move the background clip onto the middle track...
 |
| Transition is using whatever clip is on track A or above, track B excluding. |
Neat, huh?
So the overall mechanics of MLT transitions are slightly more complex, but basically simple as this:
- the "upper" frame/clip is taken from the "B" track,
- the "lower" frame is taken from whatever track between (including) track "A" up to (excluding) track "B" is the first track to have a frame.
Multitrack: Track Containers
From a simple high level perspective, there isn't also much to say about the multitrack, except that it bundles multiple tracks inside a tractor. It acts as a container of tracks for tractor element. My very limited understanding from peeking at the MLT source is that this is a deliberate design decision that avoids turning the tractor into a container itself.
In Kdenlive project files the <multitrack> element is missing, as it is optional. However, when a project has been loaded by Kdenlive and thus in turn also loaded into its MLT engine, the in-memory objects will include a multitrack object. It will sits in between the parent main tractor object and the individual timeline track objects.
Tractors: Pulling Frames 365/24
The tractor is the central element that produces the final frames that either go to Kdenlive's project monitor or that end up in a rendered audio/video file. It got its name from its operating principle: it pulls (from Latin trahere*) frames from the tracks, and then runs transitions on it. In addition, MLT allows to apply effects to the (almost) final result, but Kdenlive currently does not support this feature.
Usually, MLT plays the last producer it finds in its XML input soup. For Kdenlive projects this is always the main tractor, because it comes last and tractors are also producers. The id="maintractor" helps Kdenlive to unambiguously look up the main tractor. Remember that this tractor also represents Kdenlive's timeline configuration in terms of tracks.
1. The Top Wins
But how does the tractor arrive at its final output? Let's start with the basic rule of tractors:
- given multiple tracks with clips, take the clip from the topmost non-empty track.
 |
| The tractor takes the clip from the topmost track. |
Next, hiding video on the topmost track in the timeline results in no surprise either: now the middle clip is shown only.
 |
| With the topmost track being hidden, the tractor now takes what comes next. |
2. Consuming Tracks
Now we add a transition (such as Affine or Composite and Transform) to the topmost clip, and set its track property to reference the bottommost track with its background image clip. Now what will be result of this?
- The title clip on top of the background image clip?
- Some other result, but which?
 |
| The tractor pulls ... the middle track, because the bottom track consumes the top track! |
Luckily, Kdenlive developer Jean-Baptiste has a neat rule-of-thumb to understand what is happening in this situation:
- The transition causes track A to "consume" track B, that is, the bottommost track consumes the topmost track. In consequence, the tractor now does not consider the topmost track anymore.
Now we add the missing second transition between the middle and bottommost track. The final result is as originally intended: all tracks neatly composed onto each other.
 |
| Independent compositing using multiple transitions. |
From MLT's tractor perspective, there is now only the frame on the bottommost track left that is the result of compositing frames from the two other tracks with their clips. So, we can say that the bottom track has consumed both the middle and top tracks.
3. Hiding Tracks "Disables" Transitions
Now let's test our understanding once more. We'll now hide the bottommost track and see what will happen. To make this test more clear, we have removed the bottom transition.
 |
| With the bottommost track hidden, the tractor now pull ... the topmost track! |
Why this result? Why are we now seeing the topmost clip, yet we don't see the middle track instead?
Obviously (as in becoming visibly), the transition has been hidden together with the bottommost track. In turn, the topmost track isn't consumed anymore, so it will become the champion of the tractor. In the end, we only now get to see the topmost title clip.
- Transitions become hidden (or, disabled) together with the hidden tracks they reference.
 |
| Without a topmost clip and with a hidden bottom track, the tractor now pulls the middle track/clip. |
...yes, we're correct, the tractor now pulls the overlay clip from the middle track. Even enabling the bottom track again does not change the outcome of this timeline setup.
You've Reached The End
Now this was quite some tough stuff. Thank you very much for your patience and interest ... if you have come this far.
Source Code Pointers
For the really curious, here are pointers to MLT's source code:
- mlt/src/framework/mlt_tractor.c (MLT on GitHub)
- mlt/src/framework/mlt_mulitrack.c (MLT on GitHub)
- mlt/scr/framework/mlt_transition.c (MLT on GitHub)
* Now the time has come to finally show of the meagre result of my school lessons in Latin.