
Updated: (1) most recent insert/overwrite behavior, including enabling and disabling the timeline zone for insert/overwrite. (2) added keyboard shortcuts.
To keep things simple, let's assume for the moment that you don't need to split audio from video when throwing a clip onto the timeline. We'll later see why.
Timeline Insert
Simply spoken, with timeline insert you either:
- insert a given bin clip zone into the timeline where the playhead is, or
- insert some bin clip content starting at the clip's in point into a the timeline zone.
1. Insert Bin Clip Zone into Timeline @ Playhead
We start with the following simple example project shown below. The topmost track is locked, and the middle track is the current track.
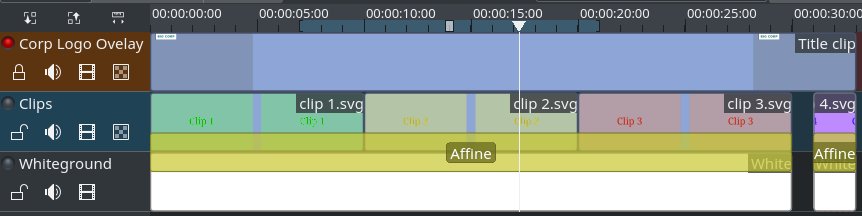 |
| Example project before insert at timeline playhead. |
Now we want to insert a specific bin clip zone into the timeline, at the playhead position. All later timeline clips should be moved for this to make room for the clip zone to be inserted.
- Deactivate Use Timeline Zone for Insert: this is a new, third button showing a ruler. It sits right next to the existing track zoom in/out buttons. Make sure this button is deactivated, so its background is the same as the overall background. As an additional visual indication the timeline zone (if any) will appear to be dimmed.
- Set the in/out points on your bin clip. This is the content to be inserted.
- Set the currently selected track into which you want to insert the bin clip zone; you may use the cursor keys up and down for to change the selected track.
- Set the playhead position to where you want to insert the bin clip zone into the timeline.
- Do a timeline insert:
- keyboard: press key V.
- mouse: menu Timeline > Insertion > Insert Clip Zone into Timeline (Insert).
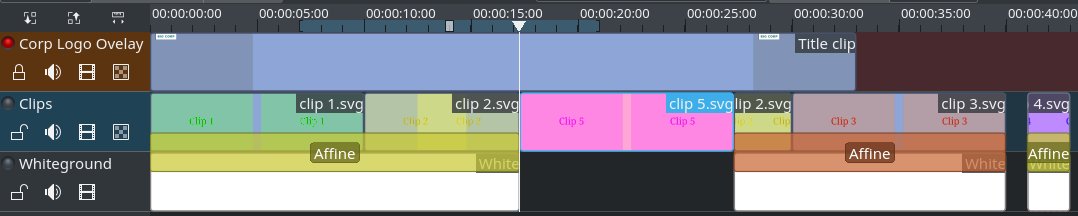 |
| After insert at timeline playhead. |
First, an insert splices all clips (and transitions) on all unlocked tracks that cross the timeline playhead position. Then, all clips beyond the playhead position on all these unlocked tracks are shifted to make room. Finally, the selected bin clip zone is inserted into the currently selected track at the playhead position.
Clips on locked tracks won't be affected by an insert.
2. Insert Bin Clip Content into Timeline Zone
This time we want to insert bin clip content into the currently set timeline zone, but not at the playhead position anymore. Again, we start with our small example project.
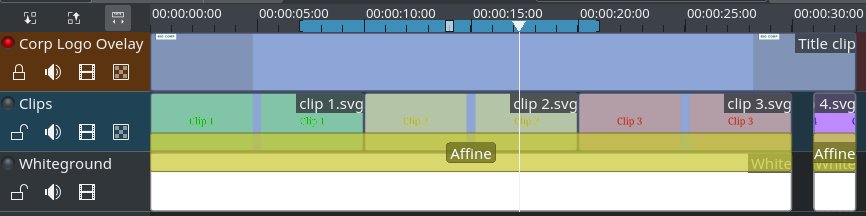 |
| Example project before insert into timeline zone. |
But this time, we have an important difference: we now activate the timeline zone for insert. So the actual bin clip content length to be inserted is the length of the timeline zone.
- Activate Use Timeline Zone for Insert: make sure this button is now activated, so its background lights up. As an additional visual indication the timeline zone (if any) will appear normal, and not dimmed as before.
- Set the in(!) point on your bin clip from which you want to start insert clip content into the timeline. The out point and thus the bin clip zone doesn't matter; only the in point now matters.
- Set the currently selected track into which you want to insert the bin clip zone; you may use the cursor keys up and down for to change the selected track.
- Set the timeline in/out points that specify the length of bin clip content to insert into the timeline, as well as where the insert starts. The playhead position now doesn't matter!
- Do a timeline insert:
- keyboard: press key V.
- mouse: menu Timeline > Insertion > Insert Clip Zone into Timeline (Insert).
 |
| After insert into timeline zone. |
First, an insert splices all clips (and transitions) on all unlocked tracks that touch the timeline zone. Then, all clips within the timeline zone on all these unlocked tracks are shifted to make room. Finally, the selected bin clip content is inserted into the currently selected track starting with the timeline zone in position and extending up to the timeline zone out position.
Clips on locked tracks won't be affected by an insert.
Note: in case the timeline zone is longer than the remaining bin clip content from the in point on, then insert will only insert the amount of bin clip content that is available. However, in case of image, title, and color clips, insert will then increase the maximum size of such a clip accordingly to fill in the timeline zone completely.
Timeline Overwrite
Simply spoken, with timeline overwrite you either:
- overwrite clips in the timeline starting from where the playhead is using a bin clip zone, or
- overwrite clips within the timeline zone with content from a bin clip.
1. Overwrite Timeline Clips @ Playhead With Bin Clip Zone
Similar to what we've seen above, the timeline overwrite works either from the timeline playhead position or on the currently set timeline zone. We still use the same example project as before, just for reference.
|
| Example project before overwrite from timeline playhead on. |
Now we want to overwrite a timeline region starting with the playhead position using a specific bin clip zone. Timeline clips won't move. However, all unlocked tracks that are not the selected track will be cleared within the zone affected by the insert.
- Deactivate Use Timeline Zone for Insert: make sure this button is deactivated, so its background is the same as the overall background. As an additional visual indication the timeline zone (if any) will appear to be dimmed.
- Set the in/out points on your bin clip. This is the content that will overwrite timeline clip content.
- Set the currently selected track on which you want to overwrite existing clips with the bin clip zone; you may use the cursor keys up and down for to change the selected track.
- Set the playhead position to where you want to start the overwrite in the timeline.
- Do a timeline overwrite:
- keyboard: press key B.
- mouse: menu Timeline > Insertion > Insert Clip Zone into Timeline (Overwrite). Yes, that's the correct menu item. Don't get fooled, the overwrite lives in the insertion submenu.
 |
| After overwrite from timeline playhead on. |
First, an overwrite splices all clips (and transitions) on all unlocked tracks that cross the timeline playhead position. Then, all clips within the zone to be overwritten with the bin clip zone gets removed from all unlocked tracks. Finally, the selected bin clip zone overwrites the currently selected track from the playhead position on.
Clips on locked tracks won't be affected by an overwrite.
2. Overwrite Timeline Zone With Bin Clip Content
This time we want to overwrite timeline clip content within the currently set timeline zone, but not from the playhead position on anymore. Again, we start with our small example project.
|
| Example project before overwrite over timeline zone. |
But this time, we have an important difference: we now activate the timeline zone for overwrite. So the actual bin clip content length used for overwriting is the length of the timeline zone.
- Activate Use Timeline Zone for Insert: make sure this button is now activated, so its background lights up. As an additional visual indication the timeline zone (if any) will appear normal, and not dimmed as before.
- Set the in(!) point on your bin clip from which you want to start overwriting clip content into the timeline. The out point and thus the bin clip zone doesn't matter; only the in point now matters.
- Set the currently selected track within which you want to use the bin clip content for overwriting; you may use the cursor keys up and down for to change the selected track.
- Set the timeline in/out points that specify the length of bin clip content used for overwriting clips in the timeline, as well as where the overwrite starts. The playhead position now doesn't matter!
- Do a timeline overwrite:
- keyboard: press key B.
- mouse: menu Timeline > Insertion > Insert Clip Zone into Timeline (Overwrite).
 |
| After overwrite over timeline zone. |
First, an overwrite splices all clips (and transitions) on all unlocked tracks within the timeline zone. Then, all clips within the zone to be overwritten with the bin clip zone gets removed from all unlocked tracks. Finally, the selected bin clip zone overwrites the currently selected track from the timeline zone in point on.
Clips on locked tracks won't be affected by an overwrite.
Quick Track Lock&Unlock
When using insert and overwrite you probably will need to lock&unlock tracks often. Fortunately, Kdenlive got new keyboard shortcuts to do this in a speedy way:
- Shift+L locks or unlocks the currently selected track.
- Ctrl+Shift+L locks all tracks except the currently selected track. When pressed again it unlocks all tracks again.
Split Audio from Video

For more information, please read on about Kdenlive's track status LEDs.