
 As part of the new advanced timeline editing operations that have been landed in the development branch, Kdenlive now has new track status indicators. Each track got its own little signal LED. It can either be unlit, or red, yellow, or green. But what does this status actually signal...?
Update: (1) updated for new unified video&audio target tracks handling. (2) added new method of selecting the audio and video target tracks using the mouse. (3) added Kdenlive configuration dialog screenshot for split audio from video option. (4) added note and screenshot about enabling/disabling splitting audio/video from the bottom bar.
Tracks States
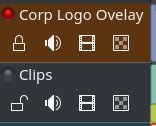
As usual, a figure (or screenshot for what it matters) is worth more than a thousand lies. The following screenshot is taken from a recent project I'm working on.
 |
| New track states |
Red track LED: this track is locked. In addition, you'll notice that the track takes on a brownish background. Please note that you can now lock&unlock the current track not only using the mouse but also using the new keyboard shortcut Shift+L.
Yellow track LED: either audio is muted, or video is hidden, or both. In case the corresponding track is also locked, the red signalization takes precedence.
Green track LED: signals that this track is an audio or video target track when using timeline inserts and overwrites. At any given time only at most one audio track can be the audio target track. Similar, only one video track can be the video target track at any given time.
But what are these target tracks after all...?! Do I need them...?
The Audio Target Track
You'll need audio target tracks only when you do timeline inserts and overwrites (the newly landed advanced timeline editing operations) and work with video/audio splitting. So if you happen to keep audio with the video clip it comes from, you don't need to worry about audio target tracks at all.
In fact, audio target track functionality only becomes active when you enable Automatically split audio and video either in Kdenlive's configuration dialog (in section Timeline) or using the split audio button in the bottom bar.
| Split audio from video in bottom bar below the timeline. |
 |
| Target tracks are required only when splitting audio from video is enabled. |
When you don't have splitting audio from video enabled, then the functionality of audio target tracks is disabled as you don't need it anyway.
Now with this option turned on, timeline insert or overwrite now operate on two separate tracks: one will receive the video clip, the other one will receive the audio of the same clip.
 |
| Target tracks. |
You select the target video track using either the keyboard or mouse, depending on your preferences:
- mouse: simply click on the status LED in the track header you want to make your target video track. You should now see a green status LED.
- keyboard: first select your target video track using the cursor up and down keys. Then press Shift+T. You should now see a green status LED.
- mouse: simply click on the status LED in the track header you want to make your audio video track. You should now see a green status LED.
- keyboard: first select your target audio track using the cursor up and down keys. Then press Shift+T. You should now see a green status LED.
That's it!